
One of the more useful aspects of Tilengine is the ability to embed it into other systems. This allows you to employ its rendering features in other game engines. For this guide, we will be embedding Tilengine into the popular Unity game engine. Source files and some basic graphical assets will be included.
Step 1: Creating a Unity Project
This step is fairly obvious. We will need to actually create a Unity project. Which version of Unity we use doesn’t particularly matter. We will want to use version 5 or greater. It is possible to use version 4 or lower, but only with a Professional license. We are going to be using a native plug-in for this project, and support for native plugins was limited to the Pro license until version 5. Version 5 was a while ago, so there shouldn’t be any issue. Any modern release of Unity will do just fine.
For the actual project creation, I am going to go with a standard 2D template. This will help for the type of rendering I intend to use, but it isn’t a requirement. You can use the 3D template if you prefer. How we use what Tilengine renders can be flexible.
Step 2: Folders and Files
Now that we have our Unity project generated, it’s time to create some standard folders, and acquire some necessary files. I like to create the following folders in my Unity Assets directory. “Graphics, Materials, Plugins, Scenes, and Scripts” In the more recent versions of Unity, the Scenes folder is added automatically, along with a default scene file. If you are using an earlier version, I recommend creating a Scenes folder, and saving your current scene to it. All Unity projects need at least one scene.
The Plugins folder is important, and it will contain the compiled libraries that we need to make Tilengine work. These native plug-in libraries will need to be downloaded.
If you don’t feel like bothering with all that, you can download the sample files I’ve included in this zip file.
This contains the 64-bit Windows versions of the Tilengine and SDL2 libraries, as well as a slightly modified version of the Tilengine C# binding. It also contains a copy of the final C# Unity script we’ll be constructing in this guide, as well as a few minor graphical assets. If you’re using a 32-bit version of Unity, or you’re developing on a Mac, you will want to visit those links above to get the appropriate libraries. This embedding won’t work properly without the correct libraries.
Once you have the correct libraries, just drop them into the Plugins folder. If you check the inspector, you’ll notice options for what platform they should be used on. You can un-check the platform that you aren’t using, but there shouldn’t be any problem to just leave those settings alone for the time being. The Tilengine C# binding file you should drop into the Scripts folder. The provided graphics you can copy to the Graphics folder, or use your own instead. That should cover all of the required files.
Step 3: Our C# Unity Script
This is where we really dig into it. The previous step was just prep-work. Now it’s time to actually code. Go to your Scripts folder in your Unity project, select create, and then select C# Script. You can name your script whatever you please, I named mine “TilengineHandler”.
using System.Collections;
using System.Collections.Generic;
using UnityEngine;
using Tilengine;

public class TilengineHandler : MonoBehaviour
{
    void Start()
    {
    }
    void Update()
    {
    }
}
This is a typical Unity C# script. You start off with a class extending the MonoBehaviour class, and basic Start and Update functions. We add the “using Tilengine;” line to include the Tilengine C# binding. Now we will start off by adding some class properties.
public int renderWidth;
public int renderHeight;
public int numLayers;
public int numSprites;
public int numAnims;
These are our public properties. They will show up in the inspector in the Unity interface. We will be able to edit them there as needed. The renderHeight and renderWidth properties should be a bit obvious. We will use them to instruct Tilengine how wide and high we want it to render our texture as. We will also use them when generating a Texture2D object for use in Unity. The numLayers, numSprites, and numAnims properties will store data that is specific to Tilengine. Tilengine requires that you specify how many layers, sprites, and animations your program will use when you initialize it. That’s where these properties come into play.
private Texture2D renderTexture;
private byte[] renderPixels;
private int frameCounter;
public static Engine renderEngine;
These are our private properties. They don’t need to be exposed to other scripts. The Texture2D is going to be used to tie the Tilengine rendering into Unity. Texture2D is the standard class for dynamically creating and editing textures in Unity. The renderPixels byte array is going to be used as a target for Tilengine’s actual rendering. The frameCounter is a simple integer that we’ll increment later and feed into Tilengine’s update loop. The public static renderEngine variable is a reference to the Tilengine itself. It needs to be static because of how the Tilengine C# binding is set up.
Now that we have the basics down. We can move on to the Start function. This is the initialization function that will run when our script first activates. It is where we typically set everything up.
void Start()
{
    this.renderTexture = new Texture2D(this.renderWidth, this.renderHeight, TextureFormat.BGRA32, false, false);
    this.renderTexture.anisoLevel = 0;
    this.renderTexture.filterMode = FilterMode.Point;

    int byteCount = this.renderWidth * this.renderHeight * 4;
    this.renderPixels = new byte[byteCount];

    TilengineHandler.renderEngine = Engine.Init(this.renderWidth, this.renderHeight, this.numLayers, this.numSprites, this.numAnims);
    TilengineHandler.renderEngine.LoadPath = "Assets/Graphics";
    TilengineHandler.renderEngine.SetRenderTarget(this.renderPixels, this.renderWidth * 4);
    TilengineHandler.renderEngine.SetBackgroundColor(new Tilengine.Color(0x77, 0x77, 0x77));
}
There’s a fair amount to unpack here. The creation of our renderTexture should be obvious enough. We need a texture in a format that Unity can handle, and a standard Texture2D is the way to go. We feed the desired width and height into the constructor, as well as the BGRA32 texture format. This is the TextureFormat that is best suited for how Tilengine handles its drawing. Manually setting the aniso level and filter mode of the texture is just to make sure that it stays nice and pixelated.
The next little snippet involves the creation of a byte array. Tilengine actually does its drawing to a byte array, and we need to create one of the proper size. Tilengine uses four distinct values per pixel for its drawing, so we need to multiply the width by the height, and multiply the product by four. Then we simply create our renderPixels property as a byte array with that number of entries.
The next block of code is where we get a static reference to the Tilengine itself by calling the Init function. We feed in the width and height, as well as how many layers, sprites, and animations we want the Tilengine to contain. The LoadPath assignment lets Tilengine know what folder we want to use as a basis for loading in assets for sprites, layers and animations. The base for this starts at the project root, which is why I set it to “Assets/Graphics.” Then we call the SetRenderTarget function in order to point the Tilengine to our created pixel array. The second argument is the length of each scan-line in bytes. That’s why we multiply our desired width by 4. And finally, we call the SetBackgroundColor function to set the background of our drawn texture to the specified color. This isn’t technically necessary, but it will give us an easy way to test if our code is working.
We now have our Start function populated with all the crucial code. Now we’ll move on quickly to the Update function.
void Update()
{
    TilengineHandler.renderEngine.UpdateFrame(this.frameCounter);
    this.frameCounter++;
    this.renderTexture.LoadRawTextureData(this.renderPixels);
    this.renderTexture.Apply();
}
This function is fairly basic. It gets called every time that Unity updates, typically 60 times a second or greater. It is where a lot of drawing logic happens. Our drawing is fairly basic though, so our Update function is going to be rather brief. The call to the UpdateFrame function takes a frame counter variable. Immediately after this call, we increment the frame counter in anticipation of the next cycle. This value gets used by the Tilengine for updating animation and sequence timing. When we call UpdateFrame, Tilengine draws its data to our byte array. The call to LoadRawTextureData is where we load the byte array into our Texture2D object. Finally, the call to Apply for our Texture2D object finalizes the transition, and insures that our Texture2D is fit for use in the rest of Unity. All the essentials of our script are finished, and ready to go.
Step 4: Actually Displaying Something
We have a script, and we have a Unity project that is properly prepared. But we don’t actually have anything to display or run at this juncture. If we apply our script to a game object in our Unity scene, and run our game, Tilengine will run properly, but we won’t actually see any results. It’s time to change that.
The first thing we need is a game object, preferably one with a rendering component. Unity comes with quite a few of these. For this example, we’re going to go with one of my favorites, the Quad. Select GameObject from the menu, then 3D Object, then Quad. This will add a single Quad object to our current scene. You can change the name of this object to whatever you like. I changed mine to be be called “TilengineDisplay.” Although we are using the 2D template, the Quad should still work just fine for our purposes. It is a very minimalist 3D mesh.
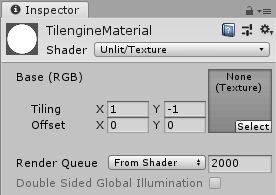
The next thing we’re going to need is a material. All renderable objects in Unity come with default materials. But we’re going to want something a bit more specific in order to take advantage of that Texture2D in our script. Navigate to the Materials folder we made in our Assets section earlier, select “Create” and then select “Material.” This will create a new Material that we can customize. Select the Material and name it what you want. I named mine “TilengineMaterial.” I’m not being terribly creative with the names, am I? Oh well, no need to get fancy. With the material selected, it’s various settings will show up in the Inspector panel. Select the Shader drop-down, navigate to the “Unlit” category, and select the “Texture” option. This is a good option that will support texture assignment, and be very easy to see. Under the Tiling settings, set the Y value to -1. Here’s a shot of what your Material settings should look like.
With that done, select your Quad game object, and look at the inspector for it. Under the Mesh Renderer component, expand the Materials property, select the first Element 0, and assign our newly created Material to it. I also went ahead and tweaked the lighting settings in our renderer component, switching most of them off. This is not strictly needed, but is still a good idea. Now our Quad will display the way we want it to. Now go down to the bottom of the Inspector, and click the Add Component button. Select “Scripts” and then select our “Tilengine Handler” script. This will assign our programmed component to the Quad game object.
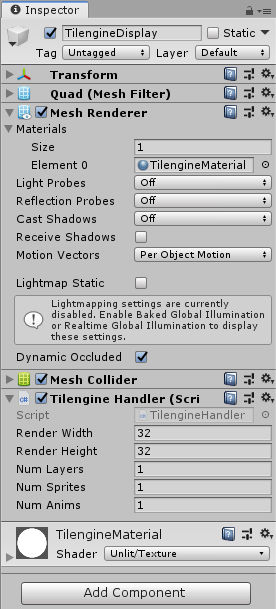
We can now assign some of the properties that we defined before. For now, I’m going to set the Render Width to 32, the Render Height to 32, and the Num Layers, Num Sprites, and Num Anims all to 1. This is just a trial example, so we aren’t going to be needing much. Here’s what the inspector for our Quad game object should look like at this point.
Now there’s just one more thing to attend to. Re-open the script we wrote, and go back to the Start function. We have an object to display, and a material to determine how it will be displayed. But we still haven’t applied our texture to the material. Go to the bottom of the Start function, and add this code.
Renderer localRenderer = this.GetComponent<Renderer>();
localRenderer.material.mainTexture = this.renderTexture;
This snippet retrieves whatever Renderer component is assigned to our game object, and then applies our Texture2D to the main texture of its principle material. With this, we are ready. You can now click on the play button, and our Quad should show up in the preview window. It should also be whatever color we defined in our script. (at present, a roughly medium gray) If you go back into the Start function, you can tweak the settings for that color and check it in the preview to see if it changes.
Step 5: More Than a Colored Square
Oh joy, we’ve made a colored square! You might be thinking that’s not very impressive. You would be right. We could easily achieve a similar result with no script, a few tweaks to the shader, and a fraction of the preparation and setup. Colored squares are a dime a dozen in Unity. And if that was all we wanted to achieve those other options would be a much better choice.
So now it’s time to re-visit the assets zip file I linked to earlier, and start pumping some actual graphics into our square. Here’s the link again if you don’t feel like scrolling up in the guide.
We’ll take the contents of the Graphics file in the zip file, and drop them into the Graphics folder of our project under Assets. There are three files in here, a .png image file, a sprite-set definition .txt file, and a sequence definition .sqx file. The trialMan.png file is exactly what it seems to be, a very small and basic image file with the graphics for an extremely simple and not particularly impressive sprite. I drew it as a quick example, so I didn’t spend much time on it. The other two files are both human-readable text files, and just contain some basic sprite and animation data. These three files combined will allow us to add a simple sprite to our project, and see it displayed on our quad.
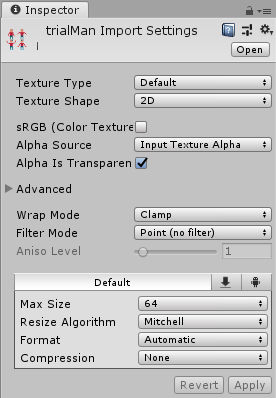
Navigate to the Graphics folder in our project, and you should be able to see our three new files. Select the trialMan.png file. The settings for it will show up in the inspector. We’re going to want to tweak these a little. For “Texture Type” select “Default.” We don’t need any extra bells and whistles here. For “Texture Shape” select “2D.” Under the “Advanced” section, de-select the Generate Mip Map option. We aren’t going to want any mip-maps. Under “Wrapper Mode” make sure that “Clamp” is selected. And for “Filter Mode” change it to “Point (no filter). Under the deployment box, change the “Max Size” to 64, and the “Compression” to “None.” That should just about do it. Here’s a quick picture of how your graphic settings ought to look.
Now we once again need to return to our TilengineHandler script. Go back up to the class properties section, and add the following properties.
private Tilengine.Sprite trialManSprite;
private Spriteset trialManSet;
private Tilengine.Animation trialManAnim;
These three private variables will allow us to create and assign values for a sprite, a spriteset, and an animation. We have to include the Tilengine reference for the Sprite and Animation variables, because Unity has its own Sprite and Animation classes, and so it is necessary to be slightly more specific.
Once we have these properties, it is time to return to our Start function. Go back to the bottom of the Start function, and add the following lines.
this.trialManSprite = TilengineHandler.renderEngine.Sprites[0];
this.trialManSet = Spriteset.FromFile("trialMan");
this.trialManSprite.Setup(this.trialManSet, TileFlags.None);

SequencePack trialManSeqPack = SequencePack.FromFile("trialMan.sqx");
Sequence trialManSeq = trialManSeqPack.Find("armWave");
this.trialManAnim = TilengineHandler.renderEngine.Animations[0];
this.trialManAnim.SetSpriteAnimation(this.trialManSprite.index, trialManSeq, 0);

this.trialManSprite.SetPosition(8, 8);
In this block of code, we start off by accessing the pool of sprite objects in the Tilengine, and retrieving the first entry to assign to our trialManSprite variable. In Tilengine, all of the layers, sprites, and animations are stored in specific arrays, whose maximum size has to be determined when the program first starts. This enforces object pooling, and limits the number of elements at any given time. The individual elements can be changed, re-assigned, and re-used as much as you please. But they are never created or destroyed after the initial setup.
After that, we load up our spriteset using the string “trialMan.” This loads in the data from our .png image and our .txt spriteset file. The next line is where we assign our loaded sprite set to our referenced sprite.
The following lines of code are where we load in the sequence pack data from our .sqx sequence file. With that data loaded, we access a specific sequence called “armWave.” If you open the .sqx file with a text editor, you can see where this sequence is defined. You could also create more sequences of your own if you wanted. Then we handle the sprite animation much as we handled the sprite itself. We get our reference by drawing the first entry from the Animations array. After that we call the SetSpriteAnimation function to assign our loaded animation to our sprite.
The last line of code takes our completed sprite, and moves it to the position (8, 8). (8 pixels on the x axis, and 8 pixels on the y axis) The sprite we’re loading in is 16 x 16, and our draw-able texture is 32 x 32, so that will center our sprite in our texture nicely.
With all of that finished, we can go back to the play button, press it, and see our sprite in the preview window. The square will still display with our background color applied. But now there is a little man in the middle of the quad, waving his arms around. We have successfully loaded in an animated sprite!
Step 6: This Square Is Kind of Small
We’re going to tend to one last detail before calling it quits. At the moment, the quad we created is fairly small in the preview window. It makes seeing any detail a bit difficult. If you know what you’re about, it shouldn’t be difficult to fix that without any further help from me. There are ways of adjusting that in the interface. But for the sake of completion, we’ll cook up a little script to automate the process for us.
Crack open the TilengineHandler script one last time. And once again, return to the bottom of the Start function. We’re going to append a final block of code.
Camera primeCamera = Camera.main;
if (primeCamera.orthographic) {
    Transform renderTransform = this.GetComponent<Transform>();
    float renderRatio = (float)this.renderWidth / (float)this.renderHeight;
    float renderScale = primeCamera.orthographicSize * 2.0f;
    renderTransform.localScale = new Vector3(renderScale * renderRatio, renderScale, 1.0f);
}
This is a fun little bit of code, but it only actually applies if we went with the 2D view. If you are using a perspective camera, nothing will change. The first line retrieves the current main camera from the scene. The next block is a conditional that checks to see if the camera is orthographic. (pure 2D) If it isn’t, nothing happens. If it is, as is the case with my project, we start to see something change.
The next line retrieves the Transform component of the current game object. (in our case, the Quad we assigned our TilengineHandler component to) We then calculate out a rendering ratio given the width and height we are targeting for our texture. Then we calculate the rendering scale that we want based on the orthographicSize value of our current 2D orthographic camera. The orthographic size is always half the height of the camera, and is in Unity’s basic measurement system. The Quad we created is by default exactly 1 Unity unit in size. For the last line, we change the local scale of our Quad based on the values we calculated. We change the y-axis scale to be twice the orthographic size of the camera. And we change the x-axis scale to be that same value multiplied by the ratio we calculated.
Now if we hit the play button again, we see that the Quad has been scaled up. Here’s approximately what it should look like.
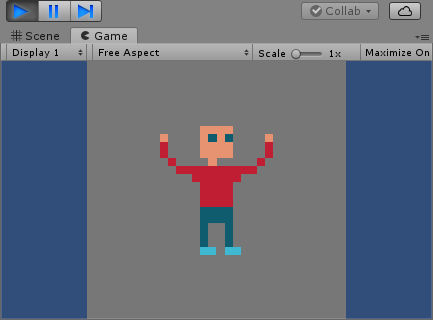
The little bit of code we wrote automatically scales our Quad up so that it will have the same vertical size as the displayed height of our scene’s camera. It’s horizontal size will be matched to whatever ratio was determined by the size of the texture we rendered. (which will keep our pixels looking nice and square)
And that about does it. We now have a solid basis for running Tilengine inside of another game engine. This is embedding in action. Keep an eye out for more guides on our site.